In the series about the internals of the geoWrite WYSIWYG text editor for the C64, this article discusses the geoWrite copy protection.
Article Series
- The Overlay System
- Screen Recovery
- Font Management
- Zero Page
- Copy Protection ← this article
- Localization
- File Format and Pagination
- Copy & Paste
- Keyboard Handling
GEOS Copy Protection Strategy
GEOS has one of the most notorious copy protection systems. The system disk contains bit patterns that are very hard to reproduce on a stock disk drive. These are checked on every boot in obfuscated code that is used to decrypt the core operating system code. This way, copies of the GEOS boot disk will not boot. Therefore, GEOS always has to be booted from the original disk, so these would break frequently, which is why GEOS came with a second boot disk, and there was a program to get broken boot disks replaced once both failed.
GEOS maker Berkeley Softworks also created several high-profile GEOS applications like geoPublish and geoCalc, which came with a similar copy protection. Even the bundled apps geoWrite, geoSpell and geoMerge have the same protection.
But with apps, it’s more complicated: On a C64 system with a single disk drive, the app needs to be on the same disk as the document that is being worked on, and since it’s a non-starter to make the user edit all their documents on the original application disk, it needs to be possible to have a copy of the app working on the user’s work disk – and still prevent pirated copies of the app from running.
The idea is to link the boot disk and the application through a serial number. On the very first boot, the GEOS system picks a random 16 bit serial number (excluding zero) and stores it on the boot disk as well as on the backup disk – this is called “installing” GEOS. On the first start of a copy-protected application, it verifies that it’s running from the original disk, and if yes, it takes the system’s serial number and stores it – this is called “installing” an application. On subsequent boots, it does not check for the original disk any more, but it only runs if its stored serial number matches the system’s.
As long as the GEOS boot disk cannot be copied, two users (who both bought GEOS) will have different serial numbers, and installed apps from one user won’t work on a different user’s GEOS. And a copy of a not-yet-installed app will refuse to install itself, because it doesn’t run from an original disk.
Code
Apart from this basic protection concept, geoWrite obfuscates what’s going on by encrypting parts of the code, to make it hard to crack the protection.
Let’s walk through the components of the copy protection in the order of what happens on application startup.
Encrypted Record 1
As discussed in part 1 of this series, the GEOS “VLIR” binary consists of 9 so-called records, which are basically individual code files. Record 0 is the main program, and records 1 through 8 get swapped in and out of memory based on what functionality is needed.
When the application gets started, the first thing the record 0 code of geoWrite does is load record 1, which contains initialization code as well as the copy protection.
        lda     #BANK_1
        jsr     loadCode
All of record 1 is encrypted, so after loading, it decrypts it by XORing every byte with $DE.
        lda     #$EB
        eor     #$35
        sta     @2
        LoadW   r0, MEM_OVERLAY
        LoadW   r1, -4000
        ldy     #0
@1:     lda     (r0),y
@2 = * + 1
        eor     #$00
        sta     (r0),y
        IncW    r0
        IncW    r1
        bne     @1
The decryption constant of $DE gets constructed using $ED XOR $35, for which there is no good reason other than maybe making it harder to search for the value.
After decryption, execution is handed to the record 1 code:
jmp MEM_OVERLAY
Installation
The first few instructions of record 1 do things in a way more complicated way than necessary, probably to deter any hackers from looking further:
.,3244  A9 32     LDA #$32
.,3246  48        PHA
.,3247  A9 54     LDA #$54
.,3249  48        PHA
.,324A  A9 3B     LDA #$3B
.,324C  85 21     STA $21
.,324E  A9 6F     LDA #$6F
.,3250  85 20     STA $20
.,3252  6C 20 00  JMP ($0020)
The source makes it clear what’s going on:
        lda     #>(@continue-1)
        pha
        lda     #<(@continue-1)
        pha
        LoadW   r15, initApp
        jmp     (r15)
@continue:
It pushes the address of the code following it as a return address (i.e. minus one) on the stack and jumps to initApp using a vector. This is just a convoluted way of calling initApp and continuing with the code below.
initApp does some initialization and calls checkSerialOrInstall. This is the first part of it:
checkSerialOrInstall:
        lda     serial
        ora     serial+1                ; does app have a serial?
        beq     @install                ; no, then install

        lda     #<GetSerialNumber
        ldx     #>GetSerialNumber
        jsr     CallRoutine
        CmpW    serial, r0              ; does the app serial match the system's?
        beq     @rts                    ; yes, return

        lda     #<txt_serial_mismatch
        ldy     #>txt_serial_mismatch
        jsr     showError               ; no, tell the user
        jsr     swap_userzp
        jmp     EnterDeskTop            ; and exit

@rts:   rts
(For the meaning of swap_userzp, check out part 4 of this series.)
serial is a 16 bit variable that is part of the record 1 code:
serial:
        .word   0                       ; not installed
If it is zero, checkSerialOrInstall jumps to the install logic. Otherwise it gets the system’s serial. (It could just call the GetSerialNumber KERNAL API directly, but instead, it calls it by loading its address into registers and calling CallRoutine, so that a reverse engineer has a harder time finding the call.)
If the system’s serial number is the same, the function returns, and the application can start. If no, it shows an error and exits the app.
Let’s look at the installer code. First, it calls executeDiskBlock, which loads a block from disk and runs it:
@install:
protExecTrack = * + 1
        lda     #0                      ; protection track (stamped in by build system)
        sta     r1L
protExecSector = * + 1
        lda     #0                      ; protection sector (stamped in by build system)
        sta     r1H
        jsr     executeDiskBlock
        beqx    @ok                     ; no error
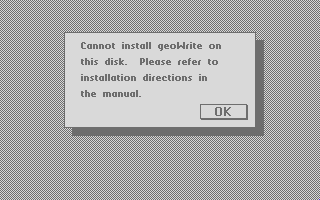
This block contains the code to verify that this is an original disk and not a copy. (We will discuss all of this in detail in the next section.) If executeDiskBlock returns with X != 0, this signals a failure, and and geoWrite exits:
        lda     #<txt_copy_protection   ; installing a non-original disk?
        ldy     #>txt_copy_protection   ; then show a non-informative message
        bra     showErrorAndExit        ; and exit to deskTop
Otherwise, the installer now knows that it’s an original disk, so it can stamp in the system’s serial into its own code. So after fetching the system’s serial again, it reads the block from disk that is supposed to contain the app’s serial. This block is part of the record 1 file.
@ok:    lda     #<GetSerialNumber
        ldx     #>GetSerialNumber
        jsr     CallRoutine             ; get OS serial number to put into app

        MoveW   r0, serial
        LoadW   r4, diskBlkBuf
protSerialTrack = * + 1
        lda     #0                      ; serial track (stamped in by build system)
        sta     r1L
protSerialSector = * + 1
        lda     #0                      ; serial sector (stamped in by build system)
        sta     r1H
        jsr     _GetBlock               ; read sector that contains code with serial
        bnex    @ierror
Note that the track and sector numbers point to the location of this very code on disk. The geoWrite build system creates a disk image with the app on it and stamps track and sector numbers in.
The serial has to be put at the correct location within the block and encrypted with the same XOR $DE that is used for decrypting all of record 1:
@offset = (serial-CODE1) .mod 254 + 2
        lda     serial                  ; get serial low
        eor     #$DE                    ; "encrypt"
        sta     diskBlkBuf+@offset
        lda     serial+1                ; get serial high
        eor     #$DE                    ; "encrypt"
        sta     diskBlkBuf+@offset+1
The offset can be calculated by the assembler: It’s the offset of the serial in the current (record 1) code, modulus 254 (because blocks on disk are 254 bytes), plus 2 (number of header bytes at the start of each block).
        LoadW   r4, diskBlkBuf
        jsr     _PutBlock               ; write back block
        beqx    installOk

        cpx     #WR_PR_ON
        beq     @wperr
@ierror:
        lda     #<txt_error_installing
        ldy     #>txt_error_installing
        bra     showErrorAndExit

@wperr: lda     #<txt_install_write_protected
        ldy     #>txt_install_write_protected

showErrorAndExit:
        jsr     showError
        jsr     swap_userzp
        jmp     EnterDeskTop
Finally, the block is written back. If there was an error, a dialog is shown, and the app exits.
If installation was successful, the following code runs:
installOk:
        asl     serial                  ; cycle serial left to obfuscate
        rol     serial+1                ; serial = serial[14..0,15]
        lda     serial
        adc     #0
        sta     serial

        jsr     swap_userzp
        jsr     GetDirHead              ; read BAM block
        jsr     swap_userzp

        MoveW   serial, curDirHead+$BE  ; store serial after "GEOS format V1.x"

        jsr     swap_userzp
        jsr     PutDirHead              ; write BAM block
        jsr     swap_userzp
This writes a copy of the serial with the bits rotated into two unused bytes of the disk’s header block, track 18, sector 0.
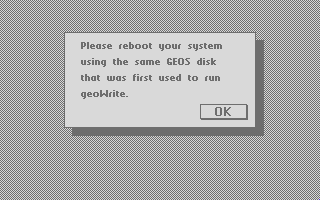
The reason for this most probably had to do with ordering broken replacement disks: Once both the system and the backup disks didn’t boot any more, the user was supposed to send in both disks, and would get new disks in return, already installed with the same serial, so that existing apps would continue to function.
Side B of the system disk contains geoWrite, and side B of the backup disk contains geoMerge, both of which had to be installed – the manual explicitly instructs the user to open each app once. So after this, both boot disks contain the obfuscated but plaintext serial on track 18, sector 0, offset $BE of side B. This could then be used to create proper replacement disks. After all, sides A of both disks were broken.
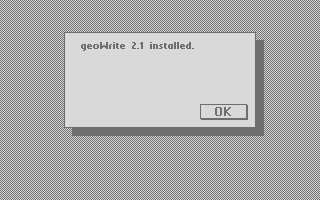
Finally, it shows a success dialog and exits.
        lda     #<txt_installed
        ldy     #>txt_installed         ; show success
        jsr     showError
        jsr     swap_userzp
        jmp     EnterDeskTop            ; and exit
Disk Signature Check
We skipped over executeDiskBlock, which was called by the installer. First, it initializes the disk:
executeDiskBlock:
        PushW   r1
        jsr     swap_userzp
        jsr     NewDisk
        jsr     swap_userzp
        PopW    r1
        bnex    @rts                    ; I/O error -> fail
Then it reads the block whose track and sector was passed in by the caller. It’s the location of the protection check code that was stamped in by the build system.
        LoadW   r4, diskBlkBuf          ; read block
        jsr     _GetBlock
        bnex    @rts                    ; I/O error -> fail
The last byte of the block is a checksum which is the lower 8 bits of the sum of all payload bytes of the sector:
        lda     #0
        ldy     #2
@loop:  clc
        adc     diskBlkBuf,y            ; checksum bytes $02-$FE
        iny
        cpy     #$FF
        bne     @loop
        cmp     diskBlkBuf+$FF          ; checksum at offset $FF
        beq     @ok

        ldx     #$FF                    ; fail
@rts:   rts
If the checksum matches, the block is run in place in the disk block buffer (diskBlkBuf at $8000):
@ok:    jsr     swap_userzp
        jsr     diskBlkBuf+2            ; execute block
        jsr     swap_userzp
        rts
The protection check block is not part of the VLIR file and not formally referenced anywhere. The build system just writes it to a random free block when it generates the final disk image. In fact, it writes another 6 unused decoy copies of the block.
This is the layout of this block:
00:  00 ff                                             block link pointer

           4c 7a 80                                    jump at entry point

                    ad 0f 18  48 29 df 8d 0f 18 20 16
10:  07 68 8d 0f 18 60 ba 86  49 a9 ee 8d 0c 1c a9 07
20:  85 33 a9 f5 85 32 a5 22  8d f5 07 20 10 f5 a0 02
30:  84 00 20 55 07 a2 10 d0  12 a0 00 20 55 07 a0 45  drive code
40:  20 55 07 20 64 07 a0 0a  20 55 07 20 64 07 ca d0
50:  e8 e8 86 00 60 50 fe b8  ad 01 1c 88 d0 f7 60 ad
60:  01 1c b8 60 ac 00 1c 10  f6 50 f9 b8 ad 01 1c c9
70:  55 f0 f1 c9 67 f0 ed 68  68 60

                                    ad e3 c1 85 03 ad
80:  e2 c1 85 02 ad e1 c1 c9  4c f0 0c a0 00 b1 02 aa
90:  c8 b1 02 85 03 86 02 a2  0a ac 89 84 b9 86 84 29
a0:  bf c9 02 90 24 d0 57 a8  88 88 b1 02 c8 c9 20 d0  computer code
b0:  f9 b1 02 c8 c9 5c d0 f1  b1 02 c8 c9 c2 d0 e9 b1
c0:  02 c8 c9 20 d0 f9 88 d0  11 a0 ff c8 b1 02 c9 85
d0:  d0 f9 c8 b1 02 c9 8b d0  f3 c8 a2 00 b1 02 9d f5
e0:  80 c8 e8 e0 06 d0 f5 20  14 c2 20 5c c2 a9 05 85
f0:  8b a2 07 86 8c 00 00 00  00 00 00 20 5f c2 60

                                                   d7  checksum
The second half of the block is GEOS code that executes on the computer side, and the first part is code that runs on the disk drive. The drive code does the actual disk authenticity check. The job of the computer part is to get the disk drive to run the drive code, and receive the result.
Running the Drive Code
GEOS comes with driver code for the 1541 and 1571 disk drives, which contains logic to upload code to the drive, execute it, and send commands, status messages and block data back and forth. The protection code reuses the driver to execute custom code and retrieve the result.
But the disk drivers don’t export this functionality as an API. Instead of adding this to the disk drivers as a private API, the authors of the protection chose to do some hacky stuff to get to these functions instead. This has the side effect of making it much harder to understand what is going on – which is a plus for protection code.
The computer part needs to call the private functions sendExecuteWithTrkSec and getDOSError in the driver. This is some code in the 1541 driver that calls both functions in sequence:
__NewDisk:
        jsr     EnterTurbo
        bnex    NewDsk2
        jsr     ClearCache
        jsr     InitForIO
        LoadB   errCount, 0
NewDsk0:
        lda     #>Drv_NewDisk
        sta     $8C
        lda     #<Drv_NewDisk
        sta     $8B
        jsr     SendExecuteWithTrkSec   ; <------
        jsr     GetDOSError             ; <------
        beq     NewDsk1
The protection code scans the __NewDisk function for the STA $8B and steals the following two instructions.
It gets the pointer to the the function by looking at the GEOS KERNAL’s API jump table entry for the symbol NewDisk:
start:  lda     NewDisk+2               ; find the code that is pointed
        sta     r0H                     ; to by the NewDisk API
        lda     NewDisk+1               ; by reading the operand of the
        sta     r0L                     ; direct/indirect JMP at the
        lda     NewDisk                 ; entry point
        cmp     #$4C                    ; direct or indirect JMP?
        beq     @direct                 ; direct, then we found the code
If the KERNAL jumps directly to the driver code (opcode $4C), the two bytes after the API’s address point to the implementation. If it’s an indirect jump, it resolves the indirection:
        ldy     #0                      ; indirect jump, so
        lda     (r0),y                  ; we need to read the vector
        tax
        iny
        lda     (r0),y
        sta     r0H                     ; and we have a pointer to the code
        stx     r0L
The 1541 and 1571 drivers differ slightly, so it checks which type of driver is running:
@direct:
        ldx     #STRUCT_MISMAT          ; default error code:
        ldy     curDrive
        lda     driveType-8,y           ; what kind of drive is this?
        and     #$BF                    ; ignore the shadow bit (drive cache)
        cmp     #$02                    ; 2: 1571
        bcc     @is1541                 ; less, then 1541!
        bne     @rts                    ; not 1571, then return with error (X != 0)
Let’s look at the 1541 code. (The 1571 is be similar.)
@is1541:
        ldy     #$FF
@loop5: iny
@loop6: lda     (r0),y                  ; search for $85 $8B
        cmp     #$85                    ; (STA $8B)
        bne     @loop5                  ; in NewDisk code
        iny
        lda     (r0),y
        cmp     #$8B
        bne     @loop6
This looks for the STA $8B just before the two calls. It then appends the next two calls to the end of its own code:
        iny

@cont:  ldx     #$00
@loop7: lda     (r0),y                  ; extract 6 bytes
        sta     @code,x                 ; copy into this code
        iny
        inx
        cpx     #6
        bne     @loop7
Finally, it enables the disk driver, and calls the two functions it extracted the pointers of to have the driver execute code at checkProtection in its own RAM and retrieve the status.
        jsr     EnterTurbo
        jsr     InitForIO

        lda     #<checkProtection       ; $0705 ptr in 1541 RAM
        sta     $8B                     ; to execute
        ldx     #>checkProtection       ; (this sector is at $0700!)
        stx     $8C
@code:  .byte   0,0,0                   ; jsr SendExecuteWithTrkSec
        .byte   0,0,0                   ; jsr GetDOSError
        jsr     DoneWithIO
@rts:   rts
checkProtection is actually $0705, and points into the drive’s buffer at $0700-$07FF, which is where the block was read. So the drive code does not have to be uploaded from the computer – it was the last block read by the driver, and it guaranteed to be located at $0700.
Checking for the Gap Sequence
Tracks on a 1541-formatted disk contain the following sequence of structures for 17 to 21 sectors, depending on the track.

A SYNC mark is followed by a sector header, and after a gap, there is another SYNC mark, followed by the sector’s data and another gap. This is repeated for the next sector.
The GEOS copy protection relies on the fact that the data in the gap, which is irrelevant for normal operation, cannot be reliably written to by stock drives. GEOS boot and application disks contain the following sequence of bytes there:
55 55 55 67 55 55 55 67
The purpose of the drive code is to test that the gap after both the header and the sector data contain only the values 0x55 and 0x67 for 16 consecutive sectors.
Before we look at the main program, let’s look at its two helpers. This is skipBytes. It just reads a certain number of bytes from disk and ignores them.
skipBytes:
        bvc     skipBytes               ; wait for byte
        clv
        lda     $1C01                   ; read it
        dey
        bne     skipBytes               ; y times
        rts
And this is checkSignature, which reads all bytes up to the next sync mark and makes sure that they are all either 0x55 or 0x67:
checkSignature:
        ldy     $1C00                   ; if we found the SYNC mark,
        bpl     @foundSync              ; the check is ok and we're done

        bvc     checkSignature          ; wait until byte ready
        clv

        lda     $1C01                   ; get byte
        cmp     #$55
        beq     checkSignature          ; has to be either signature byte $55
        cmp     #$67
        beq     checkSignature          ; or signature byte $67

        pla                             ; magic not found
        pla                             ; -> return to main code
        rts                             ; (error code remains at "2")

@foundSync:
        lda     $1C01                   ; read value
        clv
        rts
If this enounters a gap byte other than 0x55 of 0x67, it pops the return address from the stack, which returns to the drive’s main code with an error.
The main code starts out with waiting until the read head passes the header of sector 0 of the current track and reading the header. It calls a function in the DOS ROM ($F510) for this:
        lda     #>(buffer-$8000+$0700)
        sta     $33
        lda     #<(buffer-$8000+$0700)
        sta     $32                     ; set pointer to track/sector for ROM call
        lda     $22                     ; current track number
        sta     $07F5                   ; (sector is 0)
        jsr     $F510                   ; ROM call: find and read block header
There are two more bytes that are part of the header that haven’t been read yet (the “OFF” bytes), which have to be skipped:
        ldy     #2
        sty     $00                     ; set default error code 2: "READ ERROR"
        jsr     skipBytes               ; skip 2 bytes
The next bytes to be read are now the sector header’s gap bytes.
The remainder of the code now iterates over 16 sectors, always skipping all header bytes and data bytes, and checking for 0x55 and 0x67 values in the gaps:
        ldx     #16
        bne     @1                      ; check 16 headers and sectors

@loop:  ldy     #<$100                  ; skip a total of
        jsr     skipBytes               ; 325 GCR bytes
        ldy     #$45                    ; = 260 data bytes
        jsr     skipBytes               ; = marker + full block + checksum + filler
        jsr     checkSignature          ; check signature after data block
        ldy     #10
        jsr     skipBytes               ; skip full header
@1:     jsr     checkSignature          ; check signature after header
        dex
        bne     @loop                   ; repeat
        inx
        stx     $00                     ; set error code 1: "OK"
        rts
If checkSignature never failed, a status code indicating success will be set, which the computer part of the protection code will fetch.
Encrypted Code in Record 0
To make cracking the protection harder, there is one more component: Somewhere in the initialization code, record 1 checksums itself, and uses this checksum as a key to decrypt one function in record 0. So if someone was to crack the protection by changing any of the code in record 1, the checksum would be different, the one function in record 0 would be garbled, and the app would sooner or later crash.
First, the checksum code:
decryptR00:
        LoadW   r0, MEM_OVERLAY         ; checksum code record #1
        LoadW   r1, CODE1_END-CODE1
        LoadB   r2L, 0
        ldy     #0
@loop1: lda     (r0),y
        add     r2L
        sta     r2L
        IncW    r0
        ldx     #r1
        jsr     Ddec
        bne     @loop1
It adds all bytes together and keeps the lowest 8 bits.
There are several bytes within the record 1 code that must not be part of the checksum though: The 2 bytes containing the serial number will change once the app is installed, and the value will be different on every user’s copy. So their values will be subtracted from the checksum again:
        lda     r2L                     ; remove variable bytes from checksum
        sub     serial
        sub     serial+1
Furthermore, the stamped-in track/sector pointers of the block with the signature check code and the block with the serial have to be excluded. This is because of the necessary order in the build process, which looks something like this:
- assemble the source of each record as well as the drive code block
- encrypt record 1 with a constant of $DE
- encrypt one function in record 0 with the checksum of the record 1 plaintext
- write the whole geoWrite VLIR file to a disk image
- write the drive code block to a free block on the disk image
- stamp the track and sector of the drive code block into record 1 on the disk image
- stamp the track and sector of the block that contains the serial into record 1 on the disk image
Both track/sector pointers aren’t known until step 6 and 7, but they are part of the checksum in step 3. Therefore, they are also excluded:
        sub     protExecTrack
        sub     protExecSector
        sub     protSerialTrack
        sub     protSerialSector
Now it can decrypt the one function in record 0:
        LoadW   r0, r0_encrypted_start ; decrypt some code in record 0
        LoadW   r1, r0_encrypted_start-r0_encrypted_end
        ldy     #0
@loop2: lda     (r0),y
        eor     r2L
        sta     (r0),y
        IncW    r0
        IncW    r1
        bne     @loop2
        rts
Discussion
While the geoWrite copy protection isn’t as complicated or quite as mean as the one on the GEOS system disks, it is nevertheless effective, and requires quite some effort to be cracked.
Without disassembling through the geoWrite binary, a cracker could search the whole disk for code that looks like it’s checking for the protection. Any code running on the disk and reading bytes from the head manually is a candidate. This is easy to find by looking for LDA $1C01, which would reveal the block with the gap signature check. But it’s checksummed, and the cracker wouldn’t know the algorithm, the range or the location of the checksum unless they had disassembled record 1. Besides, they might change the wrong block by mistake because of the decoy copies of this block on the disk.
So any cracking attempt would require disassembling through the geoWrite code. It is quite straightforward to find the code to load and decrypt record 1, and record 1 can either be decrypted with a small script using the key found in the code, or by dumping the memory contents after decryption.
The first few bytes of record 1 are a simple but clever obfuscation with the chance that the cracker would miss the serial check and installation code. If they do find it, they now know the track and sector of the serial on disk, and the encryption key, so they could change the serial of an installed copy, or deinstall geoWrite on the original disk.
The holy grail would be a cracked version of geoWrite that didn’t care about the serial, so a cracker could just remove the call to checkSerialOrInstall. But this would alter the checksum of record 1, and break the decryption of the one function in record 0, so the app would sooner or later crash. So removing the call to checkSerialOrInstall would also require patching the decryption to take a fixed key instead.
References
- ZAK256: GEOS-Kopierschutz (C64 Wiki)
- Michael Steil: Copy Protection Traps in GEOS for C64
- Michael Steil: Why Do C64 GEOS Boot Disks Break?
- Michael Steil: Reconstructing the GEOS 2.0 (de) Master Images from a Pile of Broken Disks
Thanks for posting this!
Were there any disk copy software back in the days for the 1571 to make copies of geos including the copy protection?
Afaik the 1571 can write a complete track and thus generate whichever pattern you’d want. Or would there be a problen where a full written track ends and meets the already written start of the full track? That would seem like a problem with mass duplicated disks too though?
About the end meeting the already written start: The signature check code looks at 16 sectors starting from sector 0, but tracks have at least 17 sectors, so the signature between the last sector and sector 0 does not matter. If duplication starts at sector 0, this should be fine then.
“$ED XOR $35” should be “$EB XOR $35”.